
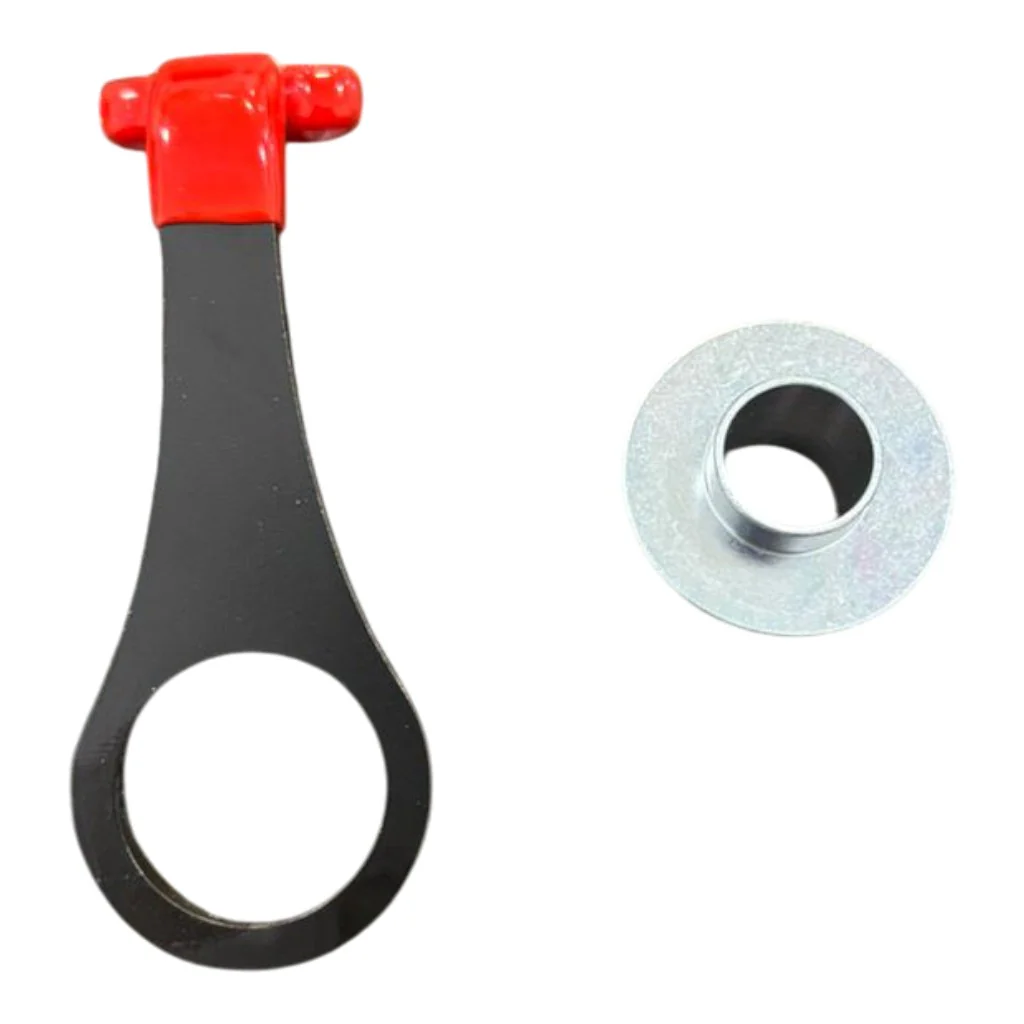
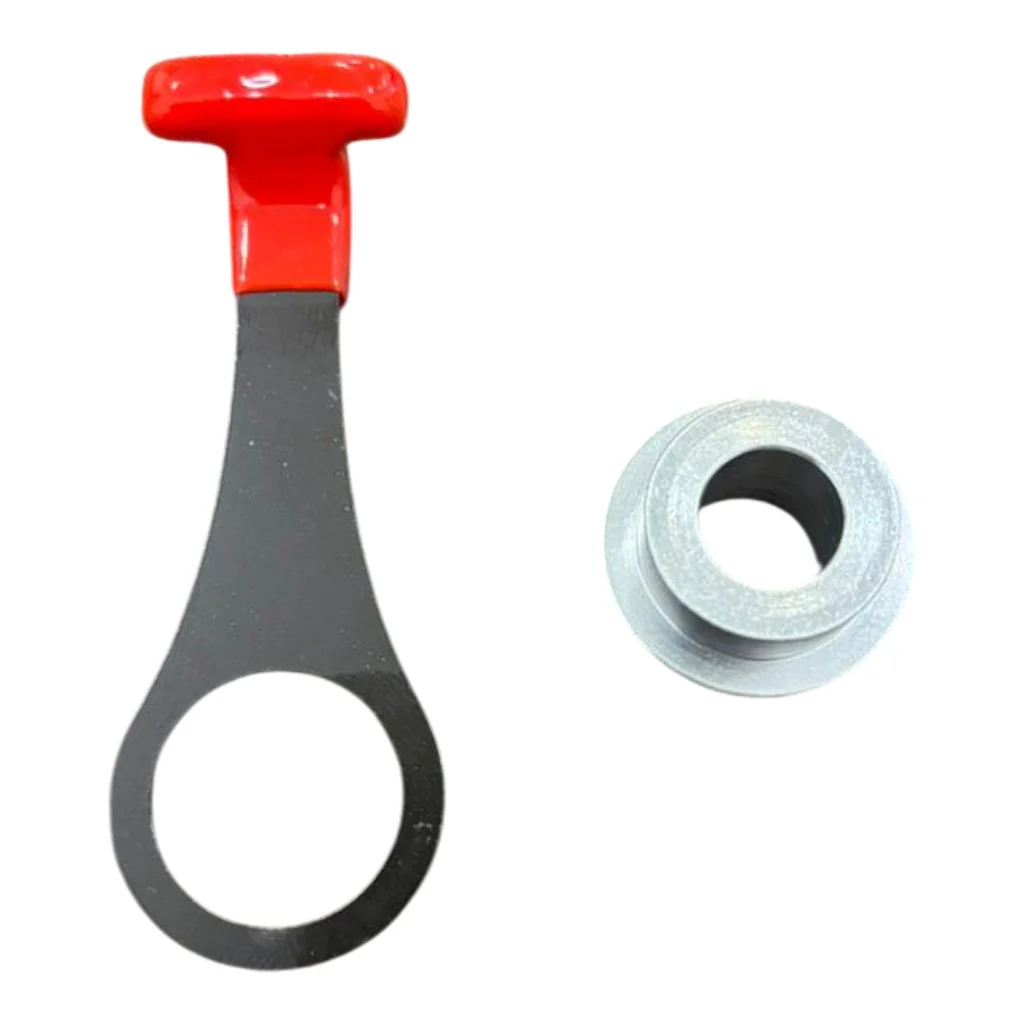
PORSCHE 9GT857839 Hook for OEM Seat Belt to Use with 6-point Harness
Description PORSCHE 9GT857839 Hook for OEM Seat Belt to Use with 6-point HarnessPORSCHE 9GT857839 Hook
The PORSCHE 9GT857839 hook is an interior trim component designed for the Porsche 911 (992 generation), including performance-oriented models such as the GT3 and GT3 RS. It functions as a garment or coat hook, providing a dedicated mounting point for hanging lightweight items within the cabin. In track-focused configurations, this component is also specified as a required element when installing official Porsche Motorsport equipment, including six-point safety belt systems.
- Designed for Porsche 911 (992) models including GT3 and GT3 RS
- Provides a secure mounting point for garments or light interior items
- Integrated component for compatibility with Porsche Motorsport safety systems
IMPORTANT INFORMATION ABOUT BOLTS AND TORQUES BOLT DIAMETER
Bolts not supplied by SCHROTH must be of grade 8.8 at a minimum.
WARNING! BOLT FAILURE MAY RESULT IN SEVERE INJURIES OR DEATH.
• Never use bolts of the wrong diameters or bolts that are too short and may allow the bolts to become loose and separate from the anchorages. Use of improper bolts will cause the racing harness to fail.
• Never use bolts that are too long and may intrude into the fuel tank or other parts of the car.
• Always tighten bolts with the proper torque. Improperly tightened bolts may loosen during harness belt use and may become separated during a crash.
• Never over-tighten bolts. Over-tightening bolts may destroy the thread and allow the bolt to separate during a crash.
TIGHTENING TORQUES BY BOLT DIMENSION
• Each bolt diameter and type of thread requires an individual torque tightening. The torques are defined by national and international standardisation organisations.
• For safe installation always tighten bolts to the recommended torque.
• For any installation use e.g. “Loctite 243” or spring washers recommended to secure bolt fastening.
M8 — 25 Nm — 18,5 ft-lb
5/16" — 25 Nm — 18,5 ft-lb
M10 — 50 Nm — 37 ft-lb
3/8" — 50 Nm — 37 ft-lb
7/16" 20 UNF — 50 Nm — 37 ft-lb
15/32" — 87 Nm — 64,5 ft-lb
CHECK ROUTING OF 3-POINT-SEAT BELT OVER OUTER SEAT BOLSTER
Ensure that the 3-point seat belt only passes over the lower seat bolster cover. The seam of the upper seat bolster cover must remain clear.
SHOULDER AND LAP BELT ROUTING [APPLIES TO ALL RESTRAINT TYPES]
To achieve optimal restraining function – lap belt strap length must be as short as possible. This requirement can be achieved by following instructions below:
VERIFICATION OF THE SHOULDER STRAP ANGLES [A] – ONLY VALID FOR 911 CARRERA [TYPE 992] GTx
angle of the shoulder straps in the vertical based on FIA Appendix J – Article 253 [B]: 0° – 20°
LAP BELT AT THE SIDE SILL [B]
- Before installing the strap, remove the perforated area of the carpet and the insulation.
- Move bucket seat to the foremost position.
- Mount belt strap fitting 2 and hook 4 in the hole provided for this purpose. Align hook 4.
- Position spacer sleeve -3-,strap end fitting -2- anh hook -4- in the hole provided for this purpose.Align hook -4- vertically upwards.
- Screw in fastening bolt -1- and tighten to a torque of 50 Nm.
Notes:
- Strap end fitting 2 points upwards
- angle of strap end fitting 2 points inwards
ANTI-SUB STRAP [C]
• Before installing the strap, remove the perforated area of the carpet and the insulation.
• Move bucket seat to the foremost position.
• Guide the harness brackets -2- through the dedicated openings and position them with the dedicated spacer sleeve -3- (only in 911 Carrera [Type 992] GTx) on the hole provided and tighten them with the dedicated fastening screws -1- (tightening torque 50 Nm).
Please note:
angle of strap end fitting 2 – points upwards
REMOVING THE 6-POINT HARNESS
on door sill
After removing the 6-point harness, re-insert the spacer sleeve -3- and screw tight with fastening bolt -1-.
Tightening torque 50 Nm
on central tunnel
After removing the 6-point harness, re-insert the spacer sleeve -2- and screw tight with fastening bolt -1-.
Tightening torque 50 Nm
PREPARATION FOR INSTALLATION ON BUCKET SEAT
Please note: When mounted on the central tunnel the lap belt must be routed below the 3-point seat belt buckle.
SAFETY INSTRUCTIONS
Optimal performance of your racing harness requires proper installation and proper use. Read and obey the following instructions with respect to racing harness installation and operation:
• Bracket installation and operation
• Wearing the racing harness
• Adjusting the racing harness
INSTALLATION INSTRUCTIONS
SHOULDER STRAPS [A]
Care must be taken to ensure that the belt runs as straight as possible from the belt strut of the roll bar to the top of the FHR.
Mounting on belt strut: see p.8 onwards.
Take additional measures to prevent slipping of the shoulder strap connection if the geometry of the roll bar does not already do so.
For example,securing with cage padding material [FIA 8875-2001 Type A] and cable ties,see yellow elements in figure below and on page 25. (schematic visualization when the straps are crossed/nor crossed)
LAP BELT AT THE TRANSMISSION TUNNEL [B]
• Before installing the strap, remove the perforated area of the carpet and the insulation.
• Move bucket seat to the foremost position.
• Position the dedicated spacer sleeve -3- on the bracket of the lap strap -2- on the hole provided and tighten with the dedicated fastening screw -1-(tightening torque 50 Nm)
• Screw in the fastening screw 1 (tightening torque 50 Nm).
Note:
Strap end fitting 2 – points upwards
angle of strap end fitting 2 – points inwards
VERIFICATION OF THE ANTI-SUB STRAP ANGLES [C] – APPLIES TO ALL RESTRAINT TYPES
OEM specific angle of the lap belt straps in the vertical [A]: 25° – 70°
Measure the angle between the vertical and the theoretical line between the harness anchorage and the center of the dedicated harness opening in the seat.
3-POINT SEAT BELT PARKING POSITION
Hook the strap end fitting horizontally and then rotate upwards.
PACKAGE CONTENTS
Installation Hardware:
2x fixing screw for lap belt
2x fixing screw for anti-sub strap
1x sleeve with collar for lap belt
1x sleeve for lap belt
2x sleeve for anti-sub strap
1x hook for 3-point seat belt parking position
SAFETY INSTRUCTIONS
Always wear the 3-point seat belt on public roads. Wearing the 6-point harness is only permitted in situations that are not subject to the public road traffic regulations in the counry of use.
When using the 6-point harness, always stow the 3-point belt in the parking position provided.To do so,attach the end fitting of the 3-point belt to the hook provided for this purpose (for details see p. 21).
The 6-point harness must only be worn in conjunction with a helmet and FHR (Frontal Head Restraint) system.
General information on the seat belts can be found in the Owner’s Manual of your vehicle.
VERIFICATION OF THE SHOULDER STRAP ANGLES [A] CONTINUED – ONLY VALID FOR 911 CARRERA [TYPE 992] GTx
VERIFICATION OF THE SHOULDER STRAP ANGLES [A] – ONLY VALID FOR CAYMAN [TYPE 981 AND TYPE 982] GTx
OEM specific angle of the shoulder straps in the vertical [B]: 0° – 40°
OEM specific angle of the shoulder straps to each other in the horizontal [A]: 10° – 70°
The straps have to be mounted at the intended attachment without crossing each other.
VERIFICATION OF THE LAP BELT STRAP ANGLES [B] – APPLIES TO ALL RESTRAINT TYPES
OEM specific angle of the lap belt straps in the vertical [A]: 15° – 90°
Measure the angle between the horizontal and the theoretical line between the harness anchorage and the center of the dedicated harness opening in the seat.
WARNING ANTI-SUB STRAP ROUTING (6-POINT) – APPLIES TO ALL RESTRAINT TYPES
Risk of severe injury and death.
Use the 6-point SCHROTH Racing Harness with anti-sub strap only if the routing of the anti-sub strap only if the racing seat is designed with anti-submaring holes.
NEVER run the anti-submaring strap over the front edge of a factory seat down to the floor. Such routing does not provide the desired anti-submarining effect, and in fact encourages submarining, which can cause severe injury and death.
INSTALLATION INSTRUCTIONS – ANTI-SUB STRAP [C]
The anti-sub strap must pass above the seat adjustment lever.
Product Information
Product Information
Shipping & Returns
Shipping & Returns
Description
Description PORSCHE 9GT857839 Hook for OEM Seat Belt to Use with 6-point HarnessPORSCHE 9GT857839 Hook
The PORSCHE 9GT857839 hook is an interior trim component designed for the Porsche 911 (992 generation), including performance-oriented models such as the GT3 and GT3 RS. It functions as a garment or coat hook, providing a dedicated mounting point for hanging lightweight items within the cabin. In track-focused configurations, this component is also specified as a required element when installing official Porsche Motorsport equipment, including six-point safety belt systems.
- Designed for Porsche 911 (992) models including GT3 and GT3 RS
- Provides a secure mounting point for garments or light interior items
- Integrated component for compatibility with Porsche Motorsport safety systems
IMPORTANT INFORMATION ABOUT BOLTS AND TORQUES BOLT DIAMETER
Bolts not supplied by SCHROTH must be of grade 8.8 at a minimum.
WARNING! BOLT FAILURE MAY RESULT IN SEVERE INJURIES OR DEATH.
• Never use bolts of the wrong diameters or bolts that are too short and may allow the bolts to become loose and separate from the anchorages. Use of improper bolts will cause the racing harness to fail.
• Never use bolts that are too long and may intrude into the fuel tank or other parts of the car.
• Always tighten bolts with the proper torque. Improperly tightened bolts may loosen during harness belt use and may become separated during a crash.
• Never over-tighten bolts. Over-tightening bolts may destroy the thread and allow the bolt to separate during a crash.
TIGHTENING TORQUES BY BOLT DIMENSION
• Each bolt diameter and type of thread requires an individual torque tightening. The torques are defined by national and international standardisation organisations.
• For safe installation always tighten bolts to the recommended torque.
• For any installation use e.g. “Loctite 243” or spring washers recommended to secure bolt fastening.
M8 — 25 Nm — 18,5 ft-lb
5/16" — 25 Nm — 18,5 ft-lb
M10 — 50 Nm — 37 ft-lb
3/8" — 50 Nm — 37 ft-lb
7/16" 20 UNF — 50 Nm — 37 ft-lb
15/32" — 87 Nm — 64,5 ft-lb
CHECK ROUTING OF 3-POINT-SEAT BELT OVER OUTER SEAT BOLSTER
Ensure that the 3-point seat belt only passes over the lower seat bolster cover. The seam of the upper seat bolster cover must remain clear.
SHOULDER AND LAP BELT ROUTING [APPLIES TO ALL RESTRAINT TYPES]
To achieve optimal restraining function – lap belt strap length must be as short as possible. This requirement can be achieved by following instructions below:
VERIFICATION OF THE SHOULDER STRAP ANGLES [A] – ONLY VALID FOR 911 CARRERA [TYPE 992] GTx
angle of the shoulder straps in the vertical based on FIA Appendix J – Article 253 [B]: 0° – 20°
LAP BELT AT THE SIDE SILL [B]
- Before installing the strap, remove the perforated area of the carpet and the insulation.
- Move bucket seat to the foremost position.
- Mount belt strap fitting 2 and hook 4 in the hole provided for this purpose. Align hook 4.
- Position spacer sleeve -3-,strap end fitting -2- anh hook -4- in the hole provided for this purpose.Align hook -4- vertically upwards.
- Screw in fastening bolt -1- and tighten to a torque of 50 Nm.
Notes:
- Strap end fitting 2 points upwards
- angle of strap end fitting 2 points inwards
ANTI-SUB STRAP [C]
• Before installing the strap, remove the perforated area of the carpet and the insulation.
• Move bucket seat to the foremost position.
• Guide the harness brackets -2- through the dedicated openings and position them with the dedicated spacer sleeve -3- (only in 911 Carrera [Type 992] GTx) on the hole provided and tighten them with the dedicated fastening screws -1- (tightening torque 50 Nm).
Please note:
angle of strap end fitting 2 – points upwards
REMOVING THE 6-POINT HARNESS
on door sill
After removing the 6-point harness, re-insert the spacer sleeve -3- and screw tight with fastening bolt -1-.
Tightening torque 50 Nm
on central tunnel
After removing the 6-point harness, re-insert the spacer sleeve -2- and screw tight with fastening bolt -1-.
Tightening torque 50 Nm
PREPARATION FOR INSTALLATION ON BUCKET SEAT
Please note: When mounted on the central tunnel the lap belt must be routed below the 3-point seat belt buckle.
SAFETY INSTRUCTIONS
Optimal performance of your racing harness requires proper installation and proper use. Read and obey the following instructions with respect to racing harness installation and operation:
• Bracket installation and operation
• Wearing the racing harness
• Adjusting the racing harness
INSTALLATION INSTRUCTIONS
SHOULDER STRAPS [A]
Care must be taken to ensure that the belt runs as straight as possible from the belt strut of the roll bar to the top of the FHR.
Mounting on belt strut: see p.8 onwards.
Take additional measures to prevent slipping of the shoulder strap connection if the geometry of the roll bar does not already do so.
For example,securing with cage padding material [FIA 8875-2001 Type A] and cable ties,see yellow elements in figure below and on page 25. (schematic visualization when the straps are crossed/nor crossed)
LAP BELT AT THE TRANSMISSION TUNNEL [B]
• Before installing the strap, remove the perforated area of the carpet and the insulation.
• Move bucket seat to the foremost position.
• Position the dedicated spacer sleeve -3- on the bracket of the lap strap -2- on the hole provided and tighten with the dedicated fastening screw -1-(tightening torque 50 Nm)
• Screw in the fastening screw 1 (tightening torque 50 Nm).
Note:
Strap end fitting 2 – points upwards
angle of strap end fitting 2 – points inwards
VERIFICATION OF THE ANTI-SUB STRAP ANGLES [C] – APPLIES TO ALL RESTRAINT TYPES
OEM specific angle of the lap belt straps in the vertical [A]: 25° – 70°
Measure the angle between the vertical and the theoretical line between the harness anchorage and the center of the dedicated harness opening in the seat.
3-POINT SEAT BELT PARKING POSITION
Hook the strap end fitting horizontally and then rotate upwards.
PACKAGE CONTENTS
Installation Hardware:
2x fixing screw for lap belt
2x fixing screw for anti-sub strap
1x sleeve with collar for lap belt
1x sleeve for lap belt
2x sleeve for anti-sub strap
1x hook for 3-point seat belt parking position
SAFETY INSTRUCTIONS
Always wear the 3-point seat belt on public roads. Wearing the 6-point harness is only permitted in situations that are not subject to the public road traffic regulations in the counry of use.
When using the 6-point harness, always stow the 3-point belt in the parking position provided.To do so,attach the end fitting of the 3-point belt to the hook provided for this purpose (for details see p. 21).
The 6-point harness must only be worn in conjunction with a helmet and FHR (Frontal Head Restraint) system.
General information on the seat belts can be found in the Owner’s Manual of your vehicle.
VERIFICATION OF THE SHOULDER STRAP ANGLES [A] CONTINUED – ONLY VALID FOR 911 CARRERA [TYPE 992] GTx
VERIFICATION OF THE SHOULDER STRAP ANGLES [A] – ONLY VALID FOR CAYMAN [TYPE 981 AND TYPE 982] GTx
OEM specific angle of the shoulder straps in the vertical [B]: 0° – 40°
OEM specific angle of the shoulder straps to each other in the horizontal [A]: 10° – 70°
The straps have to be mounted at the intended attachment without crossing each other.
VERIFICATION OF THE LAP BELT STRAP ANGLES [B] – APPLIES TO ALL RESTRAINT TYPES
OEM specific angle of the lap belt straps in the vertical [A]: 15° – 90°
Measure the angle between the horizontal and the theoretical line between the harness anchorage and the center of the dedicated harness opening in the seat.
WARNING ANTI-SUB STRAP ROUTING (6-POINT) – APPLIES TO ALL RESTRAINT TYPES
Risk of severe injury and death.
Use the 6-point SCHROTH Racing Harness with anti-sub strap only if the routing of the anti-sub strap only if the racing seat is designed with anti-submaring holes.
NEVER run the anti-submaring strap over the front edge of a factory seat down to the floor. Such routing does not provide the desired anti-submarining effect, and in fact encourages submarining, which can cause severe injury and death.
INSTALLATION INSTRUCTIONS – ANTI-SUB STRAP [C]
The anti-sub strap must pass above the seat adjustment lever.